User guide
“Sequence manager” provides a graphical representation of the design’s order and an easy way to change it at will. The "Sequence manager" is located next to "Properties" bar. All design items are represented as icons in a square box. The "Sequence" manager has two modes:  "Auto" and "Manual".
"Auto"
When the sequence is set to "Auto", the software optimizes the embroidery design to produce the best possible quality. Towards that end the objects that are filled with stitches cannot be re-sequenced and therefore appear grouped in one object. The objects that have different types, such us cut or paint, appear grouped only with their own type only of objects and may be re-ordered as a group.
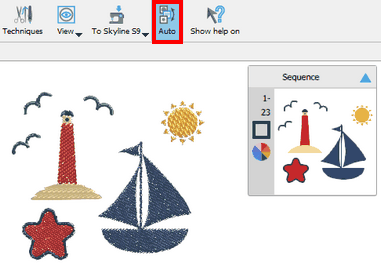
The program uses intelligent mechanisms to automatically create the sequence of the stitch items and (while in the Auto mode) you can’t control the order according to which the objects will be embroidered by using the sequence manager. You can only specify some optimization preferences to guide the software on how you want the design to be embroidered. When the sequence is set to "Auto" you can easily separate normal stitch objects from crystal, cut, stencil, paint or appliqué objects and change the order between them.
"Manual"
When the sequence is set to "Manual" or when the "Embroidery Technique" is disabled you can see all objects/shapes individually on the sequence manager. You can then re-order them at will simply by dragging them upwards or downwards.
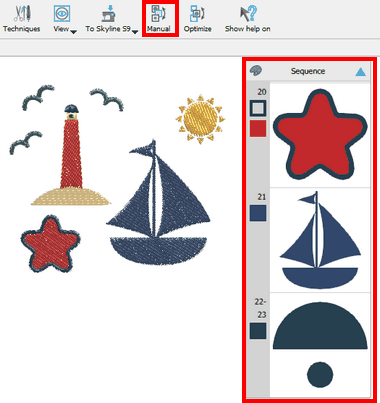
The objects positioned higher on the Sequence manager are those that will be embroidered first or the ones that will be positioned lower in an overlapping stack.
More information about the usage and customizations of the Auto-sequence is provided in chapter Embroidery sequence.
Sequence manager bar
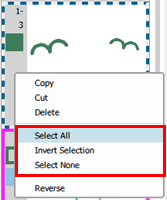
The Sequence manager appears by default on the right area of the window next to "Properties" bar. If you click on any icon of the sequence manager it gets selected and you can see it inside the design area with a highlighted rectangle around it. You can select multiple items using the "Ctrl", or Cmd key on mac OS, and/or the "Shift" keys. To select a series of sequence icons hold the "Shift" key pressed down, click on the first icon of the series and then on the last one. All the sequence icons between the ones you clicked are now selected. If you hold the "Ctrl" key pressed down and click on multiple sequence icons they get selected too. Using the "Ctrl" key, you can also remove icons from a selection. If you hold the "Ctrl" key and click on already selected sequence icons, these icons are deselected. You can also use the "Ctrl" and "Shift" keys in combination, that is, if you select a series of sequence icons using the "Shift" key and then hold the "Ctrl" key pressed down, you can add other non-sequential icons to the selection or remove selected icons from the selection. If you right click on any sequence icon when one or more sequence icons are selected, then you also get some general selection options. Using "Select all" you can select all sequence icons, using "select none" you can deselect everything and using "Inverse selection" you can select all other icons except the ones already selected.
When deleting an object, the next object in the sequence automatically becomes selected. This allows both the Sequence Manager and the user's focus to remain on the current position, streamlining the workflow and saving production time.
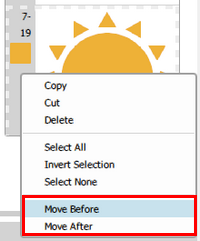
Next to each sequence icon you can see a numeric value which represents the position of this design part in the embroidery sequence. You can click and drag one or more sequence icons up or down to change their position in the embroidery sequence. For designs with too many design parts it may not be easy to drag the sequence icons to the position you want them to be. In such case, it would be easier to move one or more selected sequence icons to scroll up or down to the direction where you want them to be and right click on the sequence icon where you want them positioned. On the appearing menu you can now choose from the new options “Move Before” and “Move After”, to position the icons right before or after (accordingly) to where you right clicked.
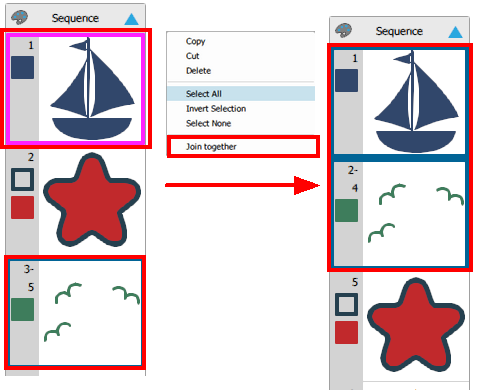
If you select non sequential icons and right click on any of the selected icons, you have the option (Join together) to bring these sequence icons one next to the other. The icons will be then moved next to the icon you right clicked upon.
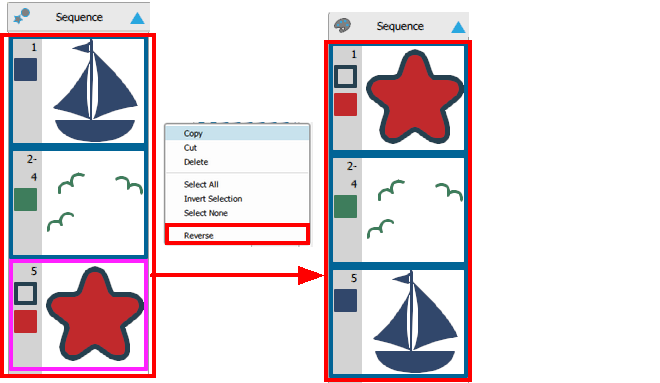
On the right click menu there is also the option to reverse the order of two or more sequence icons. To do so, simply select two or more sequence icons, right click on top of the selection and use the "Reverse" option.
Group by color
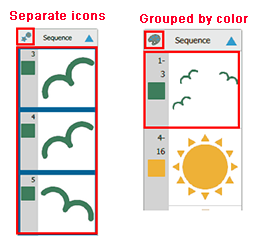
When the sequence is set to "Manual", one more icon  (group by color) appears on the title bar of the sequence manager. When you see this icon , all the design parts are separate icons. If you click on this icon, then the design parts are grouped by color and the icon changes into this palette icon
 . This means that all the sequential objects/shapes with the same color are grouped into one icon. It is a two state button, so by default you see all objects as separate icons, if you press once the objects are grouped by color and if you click once again you switch back to separate icons. The group by color function does not group objects/shapes with the same color if they have different fill or outline types. For example, it will not group two rectangles which even though they have the same color, the one is filled with "Step" fill type and the other with "Paint Step" fill type. When the sequence icons are grouped by color then next to each icon you see a series of numeric values. Additionally, you can see the fill and outline colors that are used for each icon.
For Cut, Paint, Stencil and Applique objects, the order that will be set at the sequence manager will be the same as the order that appears when you export the design to be cut ( File > Export > To Crystals/Cutters).
The sequence manager can only be resized or minimized and cannot be closed. To resize the sequence manager place the mouse cursor on top of the left edge of the sequence manager, until the cursor switches into a size handle. Click and drag to the right to make it smaller or to the left to enlarge it. If you shrink it too much, the sequence numbers and the colors are hidden. To minimize the sequence manager, you have to click on the pointing  icon on the header and to maximize it you need to click again on the same
 icon which will now point to the opposite direction.
We can also change the sequence of the design items using Order options that appear on the right click menu. These ordering options will be described in a separate section. In order to simulate the embroidery sequence, you can use slow redraw tool.
Hide/Show item
When editing designs, it can be helpful to hide certain objects in order to better focus on the underlying shapes and layers. That's why we've added a tool that allows you to hide and show specific objects at will. This feature is handy when working with designs that have multiple layers, such as fill areas, shapes, and borders stacked on top of each other. With the ability to hide these layers for clearer editing, creating intricate designs becomes simpler and more efficient.
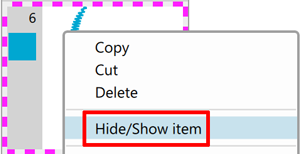
To hide or show an object you have to select it from the working area or from the Sequence manager, right click on it and select "Hide/Show item" option from the right click menu.